Showing posts with label cricut. Show all posts

Monday, January 9, 2012

Outlines Monday Challenge-


Welcome to Outline's Monday Challenge -Winter Wonderland (snow or winter themed)!


When I first saw this branch stamp I fell in love with it. It is so delicate and I can see lots of possiblities!  Since this in a Winter/Snow theme I added some polar white Flower Soft to "winter" up this card.   This little addition added so much...Love the pretty look of it. Unfortunately we have not had any snow this year, but there is still hope!

The background is from the  Silhouette store-snowflake background. I added dimensionals on the image panel to raise it as well as the little red chirper!!! The snowflake is from a cricut cartridge.  The little circle heart is also an Outlines stamp. The bird is cut from another Outlines stamp...That's 3! (see links below)

Please check out what the rest of the team has made for you today!  
Kecia, Jenny, Jeanne, and Lisa and Julie!

Don't miss a chance to win $25 worth of stamps on this challenge! 


card details:
------------------------------------------------
Stamps: G37-Tree Branch, l-1144 Birdhome (bird), F-1141 Valentine Posey Center
Cardstock: Marina Mist, Real Red
Cut files: Silhouette Snowflake background, Cricut snowflake from When It's Cold Outside
Ink: Memento Rich Cocoa and Black
Copics: E42,43    R 24,29,39
Misc: 3/4 and 1 inch SU! circle punch, dimensionals, Flower Soft Polar White, red stickles
Card size 5.5 x 5.5

Pin It!

Thursday, June 16, 2011

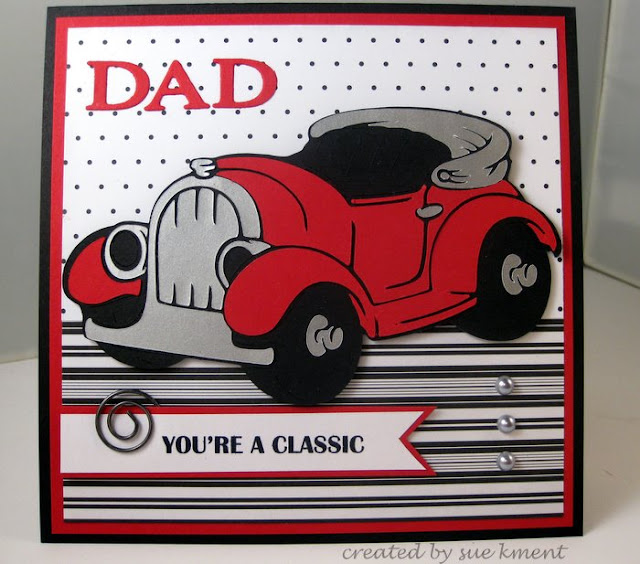
Dad, You're A Classic!


I made this card for Father's Day. My Sweetie's Dad has wanted a red convertible for several years now and this is about as close as I could get...a 'Toons convertible from the Disney Mickey and Friends Cricut cartridge!  I think he has something a little sportier and faster in mind...but I love the antiques and I love Disney too!

I am hoping to finish up a really cute Father's Day mini tomorrow or the next day, so stop back by for a peek at that too!

Short and sweet tonight so I can carry on with some other projects! Thanks for stopping by!

Card details:
----------------------------------

No stamps-sentiment computer generated, DAD with a SU! alpha die
Cardstock: Real Red, Black, Brushed Silver all SU! and Me and My Big Ideas striped DP, Polka dots is SU!
Misc: silver pearls, misc circle doo dad thingie, dimensionals

Pin It!

Saturday, June 4, 2011

A Quick Boys Will Be Boys Card

I whipped up this card for a friends son-in-law. Being a baseball coach and turning 40 I thought this would work nicely!  I wanted to play with my cricut and I wanted to use some of these dang cartridges I just had to have!

I have been working so much this week, I have not had one minute to craft or visit blogs until this weekend. Talk about crafter's shakes!!!! I think I need a craft store fix today to browse and touch lots of pretty papers...I am sure that would get me back into the swing of things! LOL

I just used some SU! papers, Boys Will Be Boys cricut cartridge, chalk. and some basic grey thicker type numbers to finish it off. Easy today...now to play with my new pile of copics that came in the mail...and sit and browse my brand new Stampin Up Catalog!

Pin It!

Sunday, February 20, 2011

Luke turns 1!


Oh My sweet grandson had his first birthday party yesterday. I posted his party invites yesterday HERE. This is the special Gwamma card I made for him. I used the cricut cartridge A Child's Year and some yummy Teresa Collins papers. I just bought this cricut cartridge...just had to have it...so had to use it :)! Next year I am sure it will have to be trucks or planes or some thing BIG BOY, but this year, I made a keepsake card. I used a sketch from Sweet Sketch Wednesday #89 that I found on Allison's blog here.

I wanted to put his weight and height inside of the card, but could not remember what it was...maybe his Mama could add it for me now that she has the card. I think he is almost 26 lbs...and pretty tall too...!

Although I did not get to go to the party because of illness, my daughter Abby dialed up Skype on her iphone and I got to watch the whole birthday cake celebration live! Luke loved the cake and I hear he was really the life of the party too! My son Matt took some wonderful pictures I am sharing with you...see pics below! You can tell I am a proud Gwamma!

 Isn't he just a handsome little boy?


Goofy Boy


I think little kids should just get boxes for their birthdays...oh so much fun! I am sure Cole and Luke will have a blast with this one(forget about what was inside LOL). I remember when Cole used to crawl into boxes and play and play inside(with lots of peek a boo time too)!


Card details:
--------------------------------
Stamps: Sentiment is from a Lily of the Valley set, image is from A Child's Year Cricut Cartridge
Ink: Versafine Black
Cardstock: Teresa Collins DP (Chic Bebe Boy), Black and Bashful Blue from SU!
Misc: Oval Nestie, SU blue satin ribbon, nestie tag for sentiment

Pin It!

Saturday, February 19, 2011

Happy Birthday Luke--- Thing 1 and Thing 2 Dr. Suess

Gwamma is so happy and so sad....Yep, today is the day. My little grandson Lukey is having his first birthday party...and I am not there! What a sad Gwamma I am...I have had and extreme cough/cold/crud thing for over a month and decided yesterday that it would not be a nice thing to pass this on to a full house of partiers and my sweet Lukey too. You know I could not keep my hands of my little boys and would have to give them lots of keeezus!
So here I sit, with a bowl of oaties and a tissue wishing I were there :(...

But technology to the rescue...Having techie kids is just plain wonderful. My son will take pics and my daughter is going to skype me when the party begins, so I can at least see Lukey with his birthday cake. That makes me feel better already!

I googled Dr Suess to find these fun svg's to use for this invite along with the Boys will be Boys cricut cartridge for the kite. If you are a little rusty on your Dr Suess facts (like me) Thing 1 and Thing 2 like to run through the house with their kites, causing mayhem wherever they go. I think that is a fitting description of both Cole and Luke! You can find this svg HERE and HERE.  My daughter wrote the clever poem on the back., Dr Suess style!

Tomorrow I will show you the card I made for Lukey's birthday along with a pic of the birthday boy, so stay tuned! On Monday I will be passing off my Amber Inks Purple torch as well, so check back in to see who will be running with the torch next......

Pin It!

Tuesday, February 8, 2011

Paper Sack Valentines.... WOYWW?


I have too much going on...I am afraid I might not get it all done. You can see a busy desk with some colored images in the planning stages of cards, and some fun little SVG   scal/cricut   Dr Suess Thing 1 and Thing 2 characters I have started for Little Lukeys first birthday invites! I also made some rolled flowers...usually I am all thumbs with those things, but I think I managed to cut some out with a rolled flower freebie svg off of Craft Edge's forum. So much easier!!! Obviously I need to get into high gear to finish these projects, but first I have to finish this project!

 Aren't these purtyyyyyy?

 I cut out the pretty filigree hearts with my cricut/scal program and a wonderful freebie from Images by Heather M.

She has some wonderful svg's on her blog! Please stop by and tell her hello!

  I cut the orginal filigree heart out of white Georgia Pacific cardstock(approx 4 inches wide), and then resized the heart to a slightly larger size (approx 6 inches) and deleted the filigree center.  I cut two pieces out of paper sack type  paper...really just 3M  mailing paper ($1 for a roll of it at The Dollar Tree) I tried cutting up paper sacks, but was too impatient to cut one at a time...more on impatience later LOL!

I bought this Elmers spray adhesive(acid free)  to spray one side of the white filigree heart and then stuck that on the paper bag heart....my fingerswere stuck together, but when I tested to see if the white hearts stuck to the paper sack heart...they did not...even after putting a heavy book on top...Again impatient, I decided to sew them on. I put two pieces of "paper sack"  hearts together and sewed around the filigree heart with a zig zag stitch. I stopped halfway through and inserted a couple pieces of chocolate into the center and finished sewing them shut. I added the fun little rolled hearts  to the top and called it good. I could think of tons of fun ways to decorate these...but I still have 25 to go....

Impatience: If I had just waited for about one hour, these white hearts would have stuck permanently to the natural paper. Just don't be in such a hurray, because if you peek, they then lose their permanence.  The spray works...my fingers were stuck together anyways. Should have worn gloves!  This project reminded me of the old Valentine making days with heart doilies and paste glue...I was having lots of fun!


Then I decided I wanted to glitter some of these babies up like this:

First coat of glue and glitter

Second coat of spray  adhesive and glitter...there that's better!

And then I decided I was getting way too labor intensive, since I had planned on making 25 or 30 of these, so I just made a few of the "fancy schmancy" glittery hearts. (some in red and some in white).  I decided I really liked just the plain and simple natural look the best.  Like this one:
plain with natural papers
with white or translucent glitter
with pretty Martha Stewart red glitter


25 more to go..............stop by and say Hello to Julia at What's On Your Workdesk Wednesday 88!

Pin It!

Thursday, January 27, 2011

Amber Ink Birthday Challenge


Come join the party! Amber Ink's InKredible 21 Day Challenge today  is a big birthday celebration...a wee bit late for our Miss Amber's actual birthday celebration, but I think she will enjoy this excuse to keep the party going LOL! If you are looking for inspiration, take a peek here!  The winner gets to design a set with Miss Amber herself...that sounds like soooo much fun!

What party is complete without a card, a cake  and a prezzie? I tell ya, I had so much fun making this trio of  craftiness with Amber Ink digi designer ipaper ...Now, Larissa would cringe knowing that I have never used digi paper, so this was a new experience for me! ...and boy do I love it! Just pick you paper and hit print...what could be easier and more convenient than that?

I used the Amber Ink ipaper named Shot Through the Heart. This pattern comes in numerous color combos as well.  I used my new Sweet Treats cricut cartridge to cut all the fun creations here. I cut the card at 6 inches, the cupcake holder at 5 inches (I think...already forgot) and the little prezzie box at 4 inches (?)...guess I am going to have to start writing those things down. I added some pretty glitter on the white cricut bow and added some Dots and Dashes polka dot ribbon as well. And I am not going to tell you what happened to the "birthday cake" after my "photo shoot"...use your imagination! mmmmmm....


Pin It!

Sunday, October 17, 2010

A cricut Mini Album-Hawaii 2010-WOYWW?

 This is what I just finished on my Workdesk today.
 Check out the link at the end of this post to meet a bunch of great crafters!

I wanted to play with my long neglected Cricut and SCAL  this past weekend, so this is what I made. I had this real lightweight chipboard/cardboard I wanted to see if my Cricut would cut (it did with multicut 2) Cool...and then I cut a bunch of Basic Grey DP using my Plantin Schoolbook cartridge to adhere to the cardboard.. I really planned on making an accordian type mini, but that didn't work out, so out came my Bind It All to the rescue.  I am a new user to all these electronic cutters and programs. I use it a couple times then forget how I used it by the next time I get back to it. Time to start the learning curve all over again.........LOL!
I cut the pages with my Cricut, the letters and numbers with my SCAL program. All the flowers and journaling pieces will be included so this little present can be finished by the recipient after they add their pictures.

This is one of those "gotta use my tools" projects and I ended up having so much fun. I love mini albums. I have a Halloween mini I made of Cole at the pumpkin patch a few years ago to show you soon.

And this is what my desk looked like after finishing my Hawaii book...already more projects started! What a mess!

Hope you can take a few minutes and pop on over to Stamping Ground to say Hello to Julia and all the other What's On Your Workdesk? Wednesday players!

Mini details:
------------------------------------

Stamps: Ali Edwards Technique Tuesday Journaler stamps, Clear Stamps Journal Stamps
Cardstock: Basic Grey DP
Ink: Memento Cocoa
Misc: SU! punches for the flowers, lavender crystals by Kaisercraft, misc ribbon,

Pin It!

Wednesday, August 11, 2010

Monkey Notes! Wowwy 62

He we go WOYWW'ers  #62!...I finally finished this dang monkey notebook. It has been haunting me and just hanging around on my desk for about a month. I missed you all last week, but I was on vacation! If you want to see what I am talking about, go visit Julia at The Stamping Ground!

Glad to have this notebook finished and ready to give to Adrian's Mom!  Adrian is 3 years old and says lots of funny things. I made this little album for his Mommy to make notes of all his famous quotes. He is not the typical kid...most kids want a dog...he wants a pet monkey. Go figure............

I used my cricut, xyron and a premade notebook for this project. I did learn that if you try to put a cricut monkey with google eyes through the xyron, his eyes will come out all squished! This little monkey got a new set of eyeballs after that! Also showing you a sample of a couple pages. The pages are all decorated differently, but within the same theme. I also added a few print outs of his wonderful art work too!


Project details:
--------------------------

Stamps: Stampendous Changitos and Take Note
Cardstock: Old Olive, Choc Chip and Kraft
Ink: Choc Chip, Old Olive, Versafine black, chalk
Misc: premade notebook, SU leaf diecut, cricut plantin schoolbook cartridge for alphabet, New Arrival for the monkey,  googly eyes, lots of pretty ribbon

Pin It!

Thursday, December 17, 2009

3 Clovers Thursday Challenge #44-Decorate your tree with an Ornament!


The challenge this week at 3 Clovers Thursday Challenge is to make an ornament! Wellll...I have been so busy, too busy to play with my new toy (Cricut).  So I decided this would be my first project...make an ornament that also holds a gift card. Now, I need a lot of these babies, so I better get busy...running out of time!   I made one a little more "manly" and then made one with my first Magnolia. I won this fun stamp from the new Fancy & Fussy Friday Challenge Blog. Boy did I win good "stuff" too. I hope to get another project in with their wonderful candy before the holidays.  I hope you can find the time to visit both challenges to see what is going on!

I am way behind on visiting all my blogging buddies, but never fear...I will catch up some day soon I hope! My Google Reader is so full...oh goodness gracious I bet there is good "stuff" to behold!

I have been busy with my annual woodcraft...cutting wood at the last minute...call me Last Minute Lizzie! I swear I am not doing this at the last minute next year...You hold me to it okay??!!!!!!!!!!  I finished the snowman quilt I was making for my grandson Cole and took it too him last weekend. What a wonderful couple of days. I always hate to leave them behind when I pull out of their drive way. (sniff sniff I miss them)
I hope to get a picture of him all wrapped in his new blankey posted soon. He loved his pillow the best! He is just getting to that age where he gets to have a pillow, so he was excited to have his very own.
 

I baked up most of my cookies this week too, but tomorrow is back to work and the vacation days are done...YIKES! I baked a few new ones this year...I hope I can find time to share...I know you are waiting Mary LOL!


The inside is a gift card holder. Notice my fave gift card....

I cut out the ornament at 5 inches. I actually cut 2 out of just plain white and then a full one out of DP and then a partial one out of DP also. I glued the top parts together and scored at the top of the ball so it would open easily. Pretty easy and quick.

Well, back to work finishing projects for Christmas...watch for those next week too. Thanks for stopping by. I know we are all crazy busy, but I have to tell you...taking the time for a little creative break is just what I needed...and I bet you do too! Recharge!!

Details:

----------------------------------

Stamps: Sitting Tilda with Candy

Cardstock: Cosmo Cricket and DCWV (blue)


Ink: Colored with copics

Misc: Cricut Gift tag cartridge, Sizzix tag die, Cricut snowflake cartridge, SU! organza ribbon, blue pearls on snowflakes, silver cording

Pin It!
Related Posts Plugin for WordPress, Blogger...